 Click here to learn about and purchase Bare-Metal® Foil Click here to learn about and purchase Bare-Metal® Foil
 Click here to read about and purchase the Bare-Metal® Panel Scriber Click here to read about and purchase the Bare-Metal® Panel Scriber
 Click here for Polytek® Mold Making Rubber Compounds Click here for Polytek® Mold Making Rubber Compounds
 Click here for Hyperlast® Polyurethane Casting Resin Click here for Hyperlast® Polyurethane Casting Resin
 Click here learn about purchase Experts-Choice® Decal Film Click here learn about purchase Experts-Choice® Decal Film
|
Introduction - 1 - 2 - 3 - 4 - 5
-
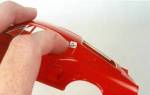
#16 For me, drip moldings that are chromed are next. Because of the thickness of the plastic for many of these moldings, covering the curved corner requires a bit different technique. Press the corner piece of Bare-Metal Foil on the inside edge first, then work the wrinkles out with the toothpicks. Once these tight curves on the thick part of the molding is done, it is easy to connect the longer sections of the molding. Here, a piece was needed for the front molding by the vent window, a piece for the top, and a last piece for the molding at the back. If there is molding on the door tops, do this next.
|
|
-
#17 If the model you are Foiling has any other side trim, cover it now. This includes side trim, trim around the wheel wells, rocker panels, hood and front and/or rear fender trim, and any other trim pieces along these lines as some of the hardest pieces to Bare-Metal Foil are coming up!
|
|
-
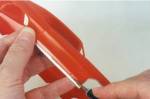
#18 Door handles and keyholes are among some of the most difficult moldings to cover. Two pieces of Foil may be necessary for a door handle. If that is the case, apply the bottom piece first, work it in place fully, then remove the excess Foil before covering the top of the handle. One piece can usually be made to work, press it in place on the top of the handle and carefully fold it under the handle, pushing it in place with the flat toothpick. When it is pretty much over the handle, press it firmly in place with your finger.
|
|
-
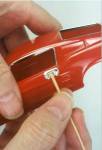
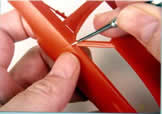
#19 Carefully work the wrinkles out until the handle is a one-piece plated unit. It is amazing how well Bare-Metal Foil covers most door handles in just one piece. Trim the Foil around the handle, then carefully run the sharp blade around the key hole, pressing on the Foil frequently as you are cutting. There is not much surface for the Foil to grip on a keyhole.
|
|
-
#20 Once you have cut around the keyhole, again press the Foil in firm contact. Using a flat toothpick, carefully push the Foil away from around the keyhole. You may have to do the keyhole several times to get one covered. Be persistent, it usually works out! If you have to cover the keyhole again, place the new piece of Foil so it is close to an edge of keyhole. This will make it easier to push away and allow the excess to be removed.
|
|
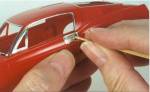
- #21 In most cases, this will be the hardest trim to cover. Not always as some scripts will be even more challenging!
|
 |
Introduction - 1 - 2 - 3 - 4 - 5
|
 |