 Click here to learn about and purchase Bare-Metal® Foil Click here to learn about and purchase Bare-Metal® Foil
 Click here to read about and purchase the Bare-Metal® Panel Scriber Click here to read about and purchase the Bare-Metal® Panel Scriber
 Click here for Polytek® Mold Making Rubber Compounds Click here for Polytek® Mold Making Rubber Compounds
 Click here for Hyperlast® Polyurethane Casting Resin Click here for Hyperlast® Polyurethane Casting Resin
 Click here learn about purchase Experts-Choice® Decal Film Click here learn about purchase Experts-Choice® Decal Film
|
Introduction - 1 - 2 - 3 - 4 - 5
-
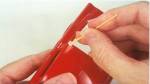
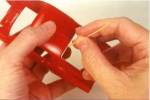
#6 Now, using the chisel end of the flat toothpick, work the Foil completely into the crevice to get the Foil in complete contact with the trim molding. The flat toothpick is also useful for smoothing any remaining wrinkles there may be in the Foil. Before going on to the next step, turn the model over and burnish the inside pieces of Foil in firm contact with the headliner, using the flat toothpick.
|
|
-
#7 Cut a straight strip of Bare-Metal Foil to connect these corners. Again, work on one edge at a time, press the Foil firmly in place with your finger, roll the Foil under and get it in firm contact with the headliner. When this is done, use the toothpicks to get the Foil in firm contact with the trim piece, just like you did with the small corner pieces (except, doing long straight pieces like this are MUCH easier to do).
|
|
-
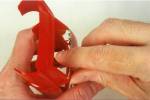
#8 On this model, the bottom corners were at a 90° angle and don't need a separate corner piece before being covered. Just apply a length of Foil to cover the trim. Press it in place with your finger and cut the bottom piece as shown, along the inside of the molding. Then just roll the Foil over to the inside, as you have done previously. Burnish this piece in place, then move on to the other two edges. Overlap the bottom piece as you did the side pieces.
|
|
-
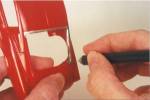
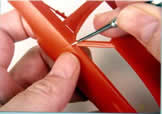
#9 Using the sharp knife, carefully cut all around the molding, being careful not to slip and cut the Foil you just laid down. If that happens, stop and burnish the Foil to a firm contact again and continue. That will usually be all that is necessary, but if this OOPS! is visible, you will have to remove the damaged piece and install a fresh piece of Foil.
|
|
-
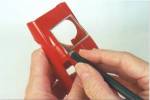
#10 After cutting all around the molding, carefully remove the excess Foil. Then go over the cut again with the flat toothpick to make sure the Foil is in perfect contact with the molding. This step may not be necessary all the time, but it is easy and is insurance that all the Foil is firmly in place. Finish by rubbing the Foil with a cloth to remove any adhesive residue that may be on the body, and this also polishes the Foil and gets it in even better contact with the moldings
|
|
Introduction - 1 - 2 - 3 - 4 - 5
|