 Click here to learn about and purchase Bare-Metal® Foil Click here to learn about and purchase Bare-Metal® Foil
 Click here to read about and purchase the Bare-Metal® Panel Scriber Click here to read about and purchase the Bare-Metal® Panel Scriber
 Click here for Polytek® Mold Making Rubber Compounds Click here for Polytek® Mold Making Rubber Compounds
 Click here for Hyperlast® Polyurethane Casting Resin Click here for Hyperlast® Polyurethane Casting Resin
 Click here learn about purchase Experts-Choice® Decal Film Click here learn about purchase Experts-Choice® Decal Film
|
Introduction - 1 - 2 - 3 - 4 - 5
-
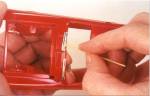
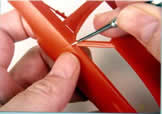
#11 On model cars with windshield wipers molded in place, I cover these separately before covering the lower windshield molding. Trim the inside pieces of Foil and remove it if it touches the molding. Otherwise trim the Foil from the wipers when you cut the excess Foil from the windshield frame. When the wiper arms are quite high above the cowl, don't press the entire piece of Foil in place, just press down the front of the Foil, then use the flat toothpick to gently push the loose Foil down into the crevice. Work the Foil carefully in place, but a slight tear won't matter IF it is on the body or frame molding. Finish covering the windshield frame.
|
|
-
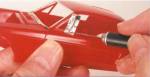
#12 On this AMT 1967 Shelby GT500, there are no indications of the upright windshield moldings. These will have to be carefully cut freehand, using the most steady hand you can muster. Refer to photos of real cars in cases like this, to make sure you are getting an accurate representation of the trim piece.
|
|
-
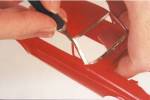
#13 In models that have them, vent windows are a challenge as there is usually not a lot of surface for the Bare-Metal Foil to adhere to. Cut a piece of Foil high enough for the back post and wide enough to cover all four edges. Press the Foil in place on the outside edge and burnish in place. Cut the Foil like you did for the 90° corners, top and bottom on the back of the post, folding this piece of Foil on the side of the post, burnish in place and then fold the Foil over to the inside of the post and again burnish in place.
|
|
-
#14 Any Foil that sticks out beyond the leading edge of the post should be carefully trimmed away. Now cut the bottom and the top of the rest of the Foil and fold it over the front facing surface of the post. The excess Foil at the top and bottom should be trimmed a bit.
|
|
-
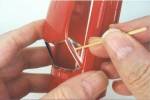
#15 Now it is just a matter of covering the front and bottom edges of the vent windows. This is pretty much as you have done for the rest of the moldings so far. Get the Foil into all the edges of the vent, then just trim the excess Foil as you have before.
|
|
Introduction - 1 - 2 - 3 - 4 - 5
|