 |
|||||||||||||||||||
|
The left side of the photo shows the clay that has been smoothed with alignment holes having been placed as well. Now when rubber is poured over this, the surface of the rubber will conform to each part and come away with a nice, even surface. Once all the clay has been added to the "floor" and around all the
parts and smoothed, then a wall must be fashioned to hold the
rubber mixture while it cures. The best and probably cheapest
thing to use is Foam Core™, which is available in just about any
drugstore or arts and crafts outlet. You'll want to make the walls When creating the wall, you'll want to have the wall as one long
strip, sliced on the outside so that you can bend it around a corner.
You won't fully cut it off until you get to the last bend and
join. Use Scotch™ tape to tape the two ends together and then
tape the inside corner where these two ends meet as well to eliminate Once you have the clay smoothed, the walls built and taped, you are ready to create the alignment holes. These were done by using the eraser end of a pencil and pushing it gently into the clay, while twisting slightly. They were placed at intervals so that the second part of the mold would "marry" itself into these holes and create the male side of the alignment holes. These holes are there so that the process of aligning the two sides of the mold when casting is accomplished much easier. This particular rubber was created by using the same amounts of both parts. Once you have equal amounts of both parts, mixing is necessary to ensure that both parts meld fully. One part was pink and one part was blue, so when they are thoroughly mixed, they turn a nice shade of purple. As you can see in the photos on the next page, we used a throwaway brush to spread the rubber around, after dribbling the rubber onto the top of the mold around each of the parts, as opposed to just pouring in the rubber and letting it settle. This method avoids trapping air bubbles, which would then become part of the mold. You'll also want to take care to gently pull on the brush tip before using it to spread the rubber so that any loose brush strands will come out in your hand and not become embedded in the rubber. Bare-Metal would like to thank Fred DeRuvo at Modeler's Resource Magazine for allowing us to share this material with our visitors. Images and text Copyright © 2002 Adroit Publications. . |
||||||||||||||||||
| Home | Bare Metal Foil | Molding Materials | Casting Resins | Starter Kit | Decals Items | Specialty Items | |
|||||||||||||||||||

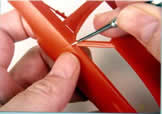

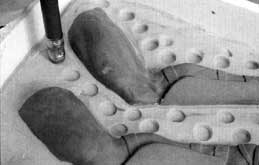 Above: A pencil is used to create alignment holes
in the clay.
Above: A pencil is used to create alignment holes
in the clay.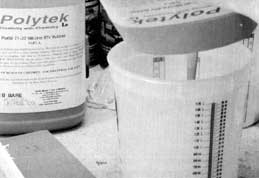 Above: Rubber is created by using the same
amounts of each part, A and B. The two parts
need to be mixed until they become a solid purple
color ( in this case because Polytek 71-20 is
being used ).
Above: Rubber is created by using the same
amounts of each part, A and B. The two parts
need to be mixed until they become a solid purple
color ( in this case because Polytek 71-20 is
being used ).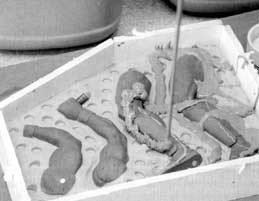 Above: Rubber is dribbled around and into the
crevices of each part.
Above: Rubber is dribbled around and into the
crevices of each part.